In summary:
- Transitioning to multi-day trips is less about gear and more about mastering core « failure-proofing » systems for navigation, nutrition, and physical readiness.
- Start by « gamifying » your skills in familiar environments before attempting a remote trip to build earned confidence.
- Underestimating calorie needs is a primary cause of exhaustion; plan to consume 2,500-4,500 calories per day, focusing on calorie-dense foods.
- A successful first trip depends on a solid plan, including choosing an appropriate route, having bail-out options, and packing an emergency food supply.
The dream is alluring: leaving the crowded day-hike loops behind for the profound quiet of a multi-day wilderness journey. You imagine waking up to a sunrise no one else sees, miles from any road. But then, the questions creep in. What if I get lost? What if I run out of food? What if I’m not strong enough? For many aspiring adventurers, this gap between ambition and skill feels like a chasm. The fear isn’t of the wild itself, but of a critical mistake made alone, far from help.
Many guides will give you a gear checklist or tell you to « just start small. » While well-intentioned, this advice often misses the core issue. It’s not about having the right tent; it’s about having the right mindset and systems. The real key to transitioning from a day hiker to a self-sufficient backpacker is not brute courage, but the methodical process of building failure-proofing systems that systematically replace fear with earned confidence. It’s about learning to think like a seasoned outdoorsperson before you even shoulder your pack.
This guide is designed to give you that framework. We will move beyond simple tips to explore the interconnected systems of navigation, nutrition, physical preparation, and trip planning. We’ll break down why first trips fail and give you the step-by-step processes to ensure yours is a success. By the end, you won’t just have a list of things to do; you’ll have a new way of thinking about wilderness travel that makes your first multi-day adventure feel not like a leap of faith, but a logical, exciting next step.
This article will guide you through the essential systems needed to build your skills and confidence for that first great adventure. Below is a summary of the key areas we will cover.
Summary: Your Path to Wilderness Self-Sufficiency
- Why Do 50% of First-Time Wilderness Adventures End in Early Retreat?
- How to Navigate Wilderness Adventures With Map and Compass When Technology Fails?
- Guided First Trip or Solo Learning: Which Builds Wilderness Adventure Confidence Faster?
- The Calorie Miscalculation That Causes Exhaustion on Wilderness Adventures
- Which UK Wilderness Adventures Can You Attempt With Just 6 Months of Hiking Experience?
- How to Calculate Food and Water Needs for 5 Days in Remote Locations?
- The Ankle Sprain That Ruins 20% of Hiking Holidays for Unprepared Travelers
- How to Reach Remote Locations Without a 4×4 or Wilderness Survival Skills?
Why Do 50% of First-Time Wilderness Adventures End in Early Retreat?
The most common reason first-time wilderness adventures fail isn’t a dramatic bear encounter or a sudden blizzard; it’s a « death by a thousand cuts. » Small, seemingly minor oversights cascade into trip-ending problems. This happens because beginners often focus on individual pieces of gear rather than the interconnected systems of preparation. The psychological weight of these cascading failures, more than any single physical challenge, is what sends people home early. In fact, many would-be backpackers quit before even starting, as psychological barriers can be the most significant hurdle.
Consider the all-too-common story of a first trip. A seasoned backpacker recalls her initial foray near Mt. Rainier, where she forgot her hiking boots and attempted the trail in sandals, resulting in bloody feet. On that same trip, she underpacked food and was constantly hungry. This isn’t an isolated incident. On a subsequent trip in California’s Emigrant Wilderness, her group got completely lost for 24 hours in the snow without proper maps. These stories highlight a critical pattern: a single point of failure (forgetting boots, a poor food plan, no backup navigation) creates a domino effect that ruins the entire experience. It’s not about being tough; it’s about being prepared for these cascading failures.
The antidote is systematic preparation. Instead of just making a packing list, you need to think in terms of systems: a navigation system (with backups), a nutrition system (that accounts for extra effort), a blister-prevention system, and a shelter system. By building and testing these systems, you’re not just preparing for a trip; you are actively « failure-proofing » it. This mental shift from packing items to building resilient systems is the single biggest differentiator between a miserable first attempt and a successful, confidence-building adventure.
How to Navigate Wilderness Adventures With Map and Compass When Technology Fails?
Your phone’s GPS is a fantastic tool, but in the wilderness, it’s a fragile link to safety. Batteries die, screens break, and satellites can be elusive in deep canyons or dense forest. True self-sufficiency comes from mastering the timeless, battery-free technology of a map and compass. This skill isn’t about becoming a master cartographer overnight; it’s about building foundational confidence through a progressive, step-by-step process. The goal is to make reading the land as intuitive as reading a street sign.
The most effective way to learn is not to throw yourself into a remote wilderness and hope for the best. Instead, you « gamify » the learning process, building skills in low-stakes environments. This method of competence stacking ensures each new skill is built on a solid foundation of success. Start with these three stages:
- Stage 1 – Urban Orienteering: Leave your phone at home and navigate your own neighborhood using a printed map. Find a specific coffee shop or landmark. This builds basic directional awareness and familiarity with using a physical map.
- Stage 2 – Park Navigation Challenge: Go to a large local park or state forest with a simple topographic map. Your goal is to find specific natural features—like a distinct bend in a creek, a prominent hill, or a large, unique tree—using only your map and compass.
- Stage 3 – Shadow Navigation: On your next day hike on a familiar, well-marked trail, pretend you are lost. Keep your map and compass out and constantly track your progress. Take bearings on distant peaks and identify landmarks on your map. This active practice in a safe setting is the final step before you’re ready for an unfamiliar trail.
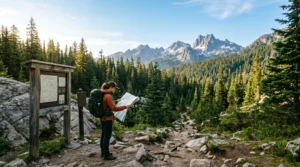
This paragraph introduces the complex concept of terrain interpretation from a map. To truly understand it, visualizing the tools is key. The illustration below shows the essential elements in action.
As you can see, the compass works in tandem with the topographic map. The contour lines on the map represent the shape of the terrain—the hills and valleys. Learning to match what you see on the map with the landscape in front of you is the core of off-trail navigation. This skill transforms you from a trail-follower into a true navigator.
Guided First Trip or Solo Learning: Which Builds Wilderness Adventure Confidence Faster?
Once you’ve decided to commit, a major question arises: should you hire a guide for your first trip or piece it together yourself? There is no single right answer, as the best path depends on your personality, budget, and learning style. Both approaches can lead to the « earned confidence » we’re seeking, but they build it in very different ways. A guided trip provides a safety net and accelerates learning, while a solo trip forces self-reliance and delivers a powerful sense of accomplishment.
Going with a professional guide service is like taking an intensive workshop. You’re immersed in the environment with an expert who can answer questions in real-time, demonstrate proper technique, and handle all the logistical and safety burdens. This frees you up to focus purely on learning and enjoying the experience. In contrast, planning your own first trip is a trial by fire. The learning happens during the long hours of pre-trip research, the careful packing, and the on-trail problem-solving. Every challenge overcome, from a tricky stream crossing to a successful meal, is a direct deposit into your confidence bank.
To make the best choice for your journey, it’s helpful to see a direct comparison of the trade-offs. The following table breaks down the key differences between a guided experience and a solo learning approach, as highlighted by a recent comparative analysis.
| Factor | Guided Experience | Solo Learning |
|---|---|---|
| Safety & Support | Professional guides trained in first aid and emergency procedures with communication equipment | Complete self-reliance; must handle navigation, weather, first aid independently |
| Skill Development | Educational component transforms walk into enriching learning experience with expert insights | Increased confidence and problem-solving through facing challenges alone; forces active skill acquisition |
| Confidence Building | Structured support provides security for beginners in unfamiliar terrain | Sense of accomplishment and peace from navigating trails independently; earned confidence |
| Cultural Immersion | Guides act as cultural ambassadors, sharing local stories, folklore, and authentic interactions | Limited to personal discovery without local context or insider knowledge |
| Logistics | All planning, transport, accommodations handled; eliminates preparation stress | Complete control over route, pace, and schedule; must manage all logistics alone |
Ultimately, the choice isn’t about which is « better, » but which is right for you, right now. Some may choose a guided trip first to build a solid foundation of skills, then follow it with a solo trip. Others may find the challenge of self-learning more rewarding from the start. The most important thing is to be honest about your current skill level and what you hope to gain from the experience.
The Calorie Miscalculation That Causes Exhaustion on Wilderness Adventures
One of the most common and debilitating mistakes beginners make is underestimating their « caloric runway. » Carrying a heavy pack over uneven terrain for hours on end is an immense physical effort that burns a staggering number of calories. Feeling perpetually tired, irritable, or weak on the trail is rarely a sign of poor fitness; it’s often a sign of « bonking »—running out of fuel. Your body is a furnace, and on a multi-day hike, you need to be constantly stoking it with high-quality fuel.
Most people are shocked to learn the numbers. While a typical sedentary day might require 2,000 calories, multi-day backpacking demands far more. According to endurance training nutrition experts, hikers can need anywhere from 2,500 to over 4,000 calories per day. A simpler way to think about it is that you need an extra 200-300 calories for every hour you spend hiking. Forgetting this simple math is a direct path to exhaustion and a miserable trip. The key is to shift your mindset from « three square meals a day » to a strategy of continuous fueling.
To avoid the dreaded « bonk, » you need a nutrient timing strategy. It’s not just about how much you eat, but when you eat it to maximize energy and recovery.
- Pre-hike (1 hour before): Kickstart your engine with 300-500 calories that are high in carbohydrates but low in fat and fiber, like oatmeal with dried fruit.
- During the hike: This is the most critical part. You must eat before you feel hungry. Aim to consume 120-240 calories (30-60 grams of carbs) every hour. To combat « trail apathy » (the feeling of not wanting to bother with food), pre-portion snacks in your hip belt pockets for easy access and set a timer to eat every hour, no matter what.
- Post-hike recovery (within 30-45 minutes of stopping): This is your recovery window. Consuming a snack with a 4:1 ratio of carbohydrates to protein helps replenish your muscles and prepares you for the next day.
This abstract nutritional information becomes much clearer when you can visualize the types of foods that pack the most punch for their weight. The image below shows a typical layout of calorie-dense trail foods.
Notice the emphasis on nuts, seeds, dried fruit, and nut butters. These foods are high in fats and carbohydrates, providing the most energy for the least weight—a critical consideration when every ounce in your pack matters. Mastering your trail nutrition is a powerful tool that transforms how you feel on the trail.
Which UK Wilderness Adventures Can You Attempt With Just 6 Months of Hiking Experience?
With a solid six months of day hiking under your belt, you have built a good fitness base. Now, the challenge is choosing a first multi-day trip in the UK that is exciting but not overwhelming. The secret is to avoid the temptation of epic, Instagram-famous routes that require advanced skills. Instead, your goal is to find a trip that exists in the « Goldilocks Zone »—not too hard, not too easy, but just right for building confidence and practicing your new systems.
Rather than providing a prescriptive list of trails, it’s more empowering to give you a blueprint for evaluating any potential adventure. This « Goldilocks Zone » blueprint helps you identify suitable trips and, just as importantly, recognize which ones to save for later. For a first multi-day trip in the UK, look for routes that fit the following criteria. For example, a section of a well-marked National Trail like the South Downs Way or the Pembrokeshire Coast Path would be an excellent choice, whereas a remote, unmarked route in the Scottish Highlands would not.
Here is a universal blueprint you can use to assess the suitability of any trail for a first multi-day backpacking trip:
- Distance Criteria: Aim for a maximum of 5-7 miles (8-11 km) per day. This may sound short, but with a heavy pack and variable terrain, you can expect to move slower (around 40 minutes per mile). This pace allows you to enjoy the scenery and practice your skills without feeling rushed.
- Elevation Threshold: Keep daily elevation gain to less than 500-1,000 feet (150-300 meters). Steep climbs are significantly harder with a full pack and can quickly lead to exhaustion or injury.
- Terrain Selection: Stick to well-marked, well-defined trails only. Your first trip is not the time to practice scrambling, off-trail route-finding, or boulder-hopping. You want a clear path where navigation is straightforward.
- Bail-out Planning: Your chosen route should have multiple, obvious exit points where you can easily get to a road or trailhead if something goes wrong. This psychological safety net is invaluable.
- Water Reliability: Before you go, mark all reliable water sources (springs, streams) on your map and, crucially, check recent trail reports or local sources to confirm they are flowing.
By applying this blueprint, you can confidently plan an adventure that matches your current skill level. A two-night trip along a section of the Jurassic Coast or a weekend exploring the gentler valleys of the Lake District or Peak District on established paths are perfect examples of UK-based trips that fit these criteria perfectly. They offer the feeling of a real wilderness adventure while keeping the objective risks low.
How to Calculate Food and Water Needs for 5 Days in Remote Locations?
As you progress to longer trips, food planning transforms from simple snacking to a complex logistical challenge. For a five-day trip, you can’t just « pack some extra bars. » You need a precise, methodical system to ensure you have enough energy to complete your journey safely, without carrying an unnecessarily heavy pack. The goal is to maximize calories while minimizing weight. Indeed, research from registered dietitians specializing in thru-hiker nutrition shows that long-distance hikers may need up to 4,500 calories per day just to maintain their body weight.
This level of planning may seem daunting, but it can be simplified using a « Menu Matrix » method. This transforms the abstract challenge of « packing for five days » into a concrete, visual plan that is easy to follow and execute. It’s a simple spreadsheet that becomes your nutritional roadmap for the entire trip.
Here’s how to build your Menu Matrix and plan your food like a pro:
- Create Your Visual Matrix: Open a spreadsheet. Create rows for each day of your trip (Day 1, Day 2, etc.). Create columns for Breakfast, Lunch, Dinner, Snacks, Total Calories, and Total Weight. This grid is your command center.
- Target Macro Ratios: Don’t just count calories; count macros. For sustained energy, make fat about 40% of your diet (add olive oil to meals, eat nuts, cheese). Ensure you get a minimum of four servings of high-quality protein daily and consume 30-60g of carbohydrates per hour while hiking.
- Pack Calorie-Dense Foods: This is the golden rule. Every item in your food bag should provide at least 100 calories per ounce (28g), and ideally 125+ calories per ounce. Foods like nut butter, olive oil, nuts, and salami are your best friends. Foods with high water content, like fresh fruit, are a luxury for the first day only.
- The Murphy’s Law Buffer: This is non-negotiable. Always, always pack one extra full day of no-cook, high-energy food. This should consist of dense energy bars, jerky, and nut butter. This is your emergency reserve in case you are delayed on the trail by weather or injury.
Water planning follows a similar logic of « plan and verify. » You should start the trail carrying at least 2 liters, but your main strategy is to know where your next water source is. Mark every river, stream, and lake on your map before you go. Your plan must include a reliable water filter or purification system and the time it will take to treat your water each day. The combination of a detailed Menu Matrix and a verified water plan is a cornerstone of safe, multi-day wilderness travel.
Key takeaways
- True wilderness confidence comes from mastering systems (navigation, nutrition, fitness), not just buying gear.
- Start by practicing skills like map reading and meal prep in low-stakes, familiar environments to « failure-proof » your first real trip.
- Physical preparation is as crucial as gear; a simple daily routine to strengthen ankles and core muscles can prevent trip-ending injuries.
The Ankle Sprain That Ruins 20% of Hiking Holidays for Unprepared Travelers
Of all the potential mishaps in the wilderness, the rolled ankle is one of the most common and insidious. An awkward step on a loose rock or tree root can instantly end a trip you’ve spent months planning. While your sturdy hiking boots provide support, they are the last line of defense. The first line of defense is the strength and stability you build in your ankles, feet, and core *before* you ever hit the trail. This proactive injury prevention, or « pre-hab, » is a critical system that many beginners overlook.
Backpacking is hard work, and it can leave your body and joints tired and achy. If you have weak knees or sensitive feet, there are proactive steps you can take to prevent multi-day hikes from taking a big toll on your body.
– Bearfoot Theory Backpacking Guide, Backpacking 101 for Beginners: My Tips for Your First Trip
The sentiment above is crucial. You don’t need to be a super-athlete, but you do need to prepare your body for the unique stresses of carrying a heavy pack over uneven ground. Proprioception—your body’s awareness of its position in space—is a skill you can train. By strengthening the small stabilizing muscles in your lower legs, you give your ankles the ability to react and correct an unstable step before it turns into a sprain. This doesn’t require hours in the gym; a simple, five-minute daily routine can make a world of difference.
Your 5-Minute Daily Ankle Injury-Proofing Plan
- Single-leg balance holds: Stand on one foot for 30-60 seconds while brushing your teeth or waiting for coffee. Repeat 3 times per leg to build stability and proprioception.
- Alphabet drawing with foot: While seated, lift one foot and trace each letter of the alphabet in the air with your big toe. This strengthens all the small stabilizing muscles.
- Gentle ankle circles: Perform 10 slow, deliberate rotations clockwise and then 10 counterclockwise with each ankle to maintain your range of motion.
- Calf raises on stairs: Stand on the edge of a step and perform 15 slow and controlled calf raises, holding for 2 seconds at the top. This strengthens the primary muscles supporting your ankle joint.
- Consistency protocol: The key is consistency. Perform this routine daily for the 4-6 weeks leading up to your trip, and continue doing it throughout the hiking season to maintain your gains.
Think of this routine as being as essential as checking your gear. It’s a small investment of time that pays huge dividends in safety and enjoyment on the trail. A strong, stable body is the most important piece of equipment you will ever carry into the wilderness.
How to Reach Remote Locations Without a 4×4 or Wilderness Survival Skills?
The allure of the wilderness often seems tied to images of rugged, off-road vehicles and expert-level survival skills. But what if you drive a standard sedan and aren’t ready to navigate miles of unmarked backcountry? The good news is that true solitude isn’t exclusively found at the end of a treacherous dirt road. The key is to redefine « remote » as finding quiet and seclusion just beyond the easily accessible, rather than in total isolation.
Redefining remote means finding solitude, not isolation, just beyond the beaten path using mapping tools to find lightly-trafficked trails in accessible National Forests.
– Beginner Backpacking Strategy, Backpacking for Beginners: Must-Know Tips for Wilderness Camping
This is a powerful mental shift. You don’t need a 4×4; you need a better strategy for solving the « last mile problem »—the gap between where your car can go and where your adventure truly begins. With clever planning and modern tools, you can access incredible wilderness experiences without specialized vehicles or skills. This approach focuses on finding the trailheads that others overlook or creatively bridging the gap to more distant ones.
Here are several practical solutions to the « last mile problem » that open up a world of possibilities for any aspiring backpacker:
- Identify Accessible Trailheads: Use online resources like AllTrails, regional trail association websites, or national park guides to filter for trails that start at trailheads with paved or well-maintained road access. There are thousands of stunning, less-traveled trails that don’t require an off-road vehicle.
- Arrange Shuttle Services: Many popular long-distance trails have local shuttle companies that can drop you off at a remote trailhead and pick you up days later. You can also use online hiking forums or Facebook groups to organize a ride-share with other hikers.
- The Bicycle Strategy: For trailheads that are just a few miles down a bumpy but passable dirt road, consider bringing a bicycle. Drive as far as you safely can, park, and then bike the final few miles to the trailhead. Lock your bike to a tree, and it will be waiting for your return.
- Leverage the Shoulder Seasons: One of the best ways to find solitude on a popular, easily accessible trail is to go when no one else is there. Visiting in the early spring or late fall (weather permitting) can give you a profound wilderness experience on a trail that is mobbed in mid-summer.
By combining these strategies, you can unlock a vast number of adventures that once seemed out of reach. The wilderness is more accessible than you think; it just requires a bit of creativity and a shift in perspective. Your greatest adventure might be waiting just a few miles beyond where everyone else decided to stop.